Category Archives: Test and Measurement

Instrumentation for testing and measurement electronic instruments and design.

What is the D2D-InStock System, anyway, and how can it help me?

Please Share

The Used-Line D2D-InStock System Demystified

The Used-Line D2D-InStock System is a shortcut to finding equipment that you need urgently.

How does the D2D-InStock System work?

It’s really quite simple.

Really.

Let’s just have a chat about this – forget about technicalities, how-tos, and all the rest.

Instead, we’ll discuss a typical scenario that describes day-to-day business in the marketplace of used (and new) scientific and industrial equipment, including test and measurement, labs, semiconductor manufacturing, and more.

You are a dealer in used Test & Measurement equipment and one bright and sunny morning you get a call from a customer (let’s call him Bob) requesting – actually, demanding – five Agilent (now Keysight) 4396B RF Network/Spectrum/Impedance analyzers, including specific fixtures. Bob is not his usual calm self. He tells you he needs this equipment right now – in fact, yesterday – and can you ship immediately (if not yesterday)?

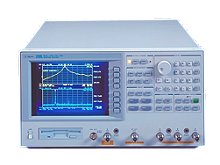
Keysight 4396B analyzer

Keysight (Previously Agilent) 4396B (from Keysight Technologies website)

The 4396B is now obsolete, but that’s Ok, you’ve listed it on Used-Line. But, here’s the rub. You have only one in stock right now, not five!

What to do?!

Fortunately, you have already finished your second cup of coffee of the day, so you are able to think relatively clearly. You know that there just has to be at least four Keysight 4396B analyzers somewhere out there in the marketplace, so who should you call? Certainly not Ghostbusters. (Oops, I’m dating myself!)

So, you get out your lists. Long lists of companies who sell new and used equipment. Phone numbers. Email addresses. All dealers like yourself. You gather your troops, asking everyone to join your search. Everyone is eager to lend a hand. They’re a dedicated crew. Well, that’s nice that you have such amenable staff, but how many hours are you all going to spend emailing and calling everyone you know in the business, trying to find these elusive analyzers?

Wait a minute! What is that new Used-Line D2D InStock System all about? Isn’t there some sort of buddy system I can use to check all over the world for the availability of these Keysight analyzers?

Well, yes, there is! And here’s the really simple part of it all! USED-LINE does all the work for you! Ok, almost all the work. There is just one small task you need to perform to contribute to this workflow in order to make it work:

Tell us what equipment you are looking for!

And that’s it. And here’s the one and only instruction that I have to give you:

Send an email to system1@used-line.com telling us what equipment you urgently need.  email

And that’s it! No need for any tables or spreadsheets. Just email us and tell us that you need 4 Keysight 4396B analyzers.

And don’t forget to mention which fixtures or other options you need with the units.

And then what?

man_happy_equipment_found

You go get another cup of coffee, and when you return to your desk, there is a strong chance that there’ll be an email from Used-Line waiting for you to let you know that there are sellers out there who have the equipment you need IN STOCK! Ok, maybe not if you were looking for a rare machine that was last seen in 1960 (a Tektronix 310, anyone?). But if not right away, if someone is selling what you need, you will hear about it from Used-Line SOON if not immediately, and will find all the information you need to contact the sellers.


No searching required by you. Used-Line does all the work! And so quickly! We also want to make Bob happy!

Please Share

Specifications and Features Now Showing in Used-Line Listings

Please Share

You’ve seen our T&M Specifications page, haven’t you? Well, it just got smarter. We added behind-the-scenes instruments that don’t necessarily fit into the T&M Specifications categories, but that do show up under ads in Used-Line listing categories.

Ok, we can hear you saying now: What are they talking about?

So, let’s explain.

Here’s how it usually works.

If you visit our Specs page, you’ll find 31 Test & Measurement Categories in which you can perform two tasks:

  • Check and compare product specs.
  • Find a particular model’s listings on Used-Line.

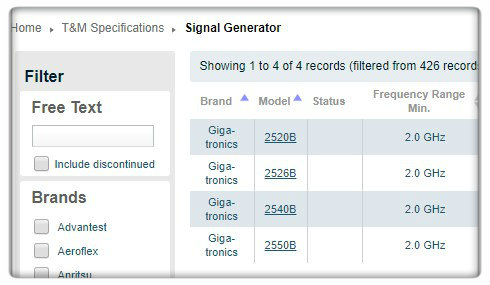
Let’s choose Signal Generators, for example. You view a table of (currently) 426 models and their specs, such as frequency ranges and output power.

Signal Generator Specifications

Signal Generators Specs on Used-Line T&M Specs page.

So, let’s pick one. We’ll select the Spanawave (formerly Giga-tronics) 2550B. When we click through we land on a page showing the specifications and a description of the 2550B. (Scroll up to view the 2550B product listings.)

That is the usual case.

Now, what happens if you want to view the specs of an item that we have not showcased on our T&M Specifications page?

What about a resistor, for example?

A pile of old resistors

Resistor, anyone?

A resistor?! You’re right. We do not have a special category for resistors in our T&M Specifications, but we do have the following categories in Used-Line’s listings of resistors ads:

Now, let’s go to Used-Line and search for a Guildline Instruments 9330, a standard resistor whose design meets the need to reduce the typical sources of errors found in older designs – that is:

  • Temperature coefficients
  • Thermal and electrical time constraints
  • Thermal EMF’s
  • Voltage and power coefficients

Scroll to the bottom of the 9330 listing results and what do you see?! A paragraph discussing the  specifications and features of the 9330 based on the manufacturer’s description!

Now you’re not going to find descriptions of every single product that is advertised for sale on Used-Line.

Yet!

But we’re working on it!

Please Share

Used-Line Has Chosen its First Dealer of the Month: Congratulations MATsolutions!

Please Share

The Used-Line Test Community Has Chosen!

MATsolutions is the Dealer of the Month.

DoftheM

blue-bar

Used-Line’s Test Community voted for you because of your customer service, honesty, and reliability!

Since 1992, MATsolutions has delivered the assurance our clients need when acquiring, maintaining, and managing high quality reconditioned test and measurement equipment. MATsolutions purchases, sells, rents, and leases equipment from over 50 manufacturers and specializes in Agilent (Keysight), Tektronix, Rohde & Schwarz, Anritsu, and Fluke products. We also provide expert test equipment calibration and repair services in our state-of-the-art ISO 17025 Accredited Laboratory. MATsolutions can provide a repair solution to maintain older test platforms beyond the OEM end of service period.

MATsolutions Products

on Used-Line.com

Fluke 5720A

Fluke 5720A

Agilent/Keysight N9010A

Agilent/Keysight N9010A

Agilent/HP E8257D

Agilent/HP E8257D

More Products from MATsolutions

Please Share

Handheld Spectrum Analyzer Competes with Benchtops

Please Share

Frequency coverage from the Anritsu MS2720T gets as good as 9 kHz to 43 GHz in model MS2720T-0743, the high end of this series of spectrum analyzers, which starts at its lower end (in terms of frequency) with a model that boasts a continuous frequency range of 9 kHz to 9 GHz. Not too shabby. Launched in December, 2012, this almost two-years-on-the-market handheld could well compete with today’s benchtop analyzers (without external mixers) in the frequency specification department.

Let’s take a look at just a few of the other specs associated with this instrument:

  • Resolution Bandwidth from 1 Hz to 10 MHz
  • Sweep mode speeds: Allow a resolution bandwidth of 30 kHz to 10 MHz with almost no impact on sweep speed
  • Dynamic range is >106 dB in 1 Hz bandwidth at 2.4 GHz
  • DANL is -160 dBm in 1 Hz bandwidth at 1 GHz (preamp on)
  • Phase noise is -104 dBc/Hz at 10 kHz offset at 1 GHz
  • Option of tracking generators from 100 kHz to 20 GHz (full-band)

Read more in the Used-Line T&M Specs pages as well as in the Related Articles below. Do check out the many capabilities available as options for the MS2720T. Not only all the signal analysis packages that a wireless engineer may need for the various data rates of carriers, but a vast selection of analyzers, such as power meter, channel scanner, GPS Receiver, and Interference Analyzer are available as options.

Used Anritsu MS2720T | used-line.comThe Spectrum Master™ MS2720T series provides field technicians and engineers with performance that rivals a benchtop spectrum analyzer. The MS2720T features a touchscreen, full-band tracking generators to 20 GHz, and best-in-class performance for dynamic range, DANL, phase noise, and sweep speed, providing unprecedented levels of spectrum monitoring, hidden signal detection, RF/microwave measurements, and testing of microwave backhauls and cellular signals.

Embedly Powered


Anritsu suggests that this spectrum analyzer, at 8 pounds “fully loaded” is light enough to take up a tower. Well, you’re not going to get me up any tower, thank you very much, with or without a handheld spectrum analyzer.

CN Tower, Toronto, Canada

CN Tower, Toronto, Canada (Photo credit: P.Naumann)

I do have quite a bit of trouble picturing an RF engineer making his way up the CN Tower, for example, with a benchtop instrument, so there must be some brave engineers who scale the heights – with their handhelds!

If it was I who had the responsibility of handling this instrument, I would be very much inclined to avail myself of the Anritsu Remote Access Tool, which lets the user sit in the comfort of his lab or office while controlling the spectrum analyzer over a LAN connection, and analyze data with the Anritsu Master Software Tools – in-between his sips of coffee.

But then some folks are made for reaching for the sky, and others are not.

Anritsu webpage for Spectrum Master MS2720T

Enhanced by Zemanta
Please Share

Chickens and the Unbroken Chain of Calibration

Please Share

A recent discussion in the LinkedIn group, Metrology & Test Measurement, on the “unbroken chain of calibration” has driven me to hone in on my personal understanding of measurement uncertainty. I am ashamed to say that I know virtually nothing (0 ±0.0031415929) about calibration despite having worked as an electronics technician in the ’90’s. My excuse is that ISO 9xxx only hit the repair floor in the ’90’s. (Well, that’s why it was called ISO 9000.)  But the National Bureau of Standards (NBS), which predates the National Institute of Standards and Technology (N.I.S.T.) by 87 years, has been around since 1901.

logo of National Institute of Standards and Te...

Logo of National Institute of Standards and Technology (Photo credit: Wikipedia)

And the NBS was predated by the International Bureau of Weight and Measures (BIPM in French). In any case, I’m not quite sure how to connect ISO 9xxx with calibration. It must come into it somewhere. All I remember was what kind of shoes to wear and grounding rules. I guess you could say that my uncertainty around these topics is not measurable or traceable!

How do we arrive at an unbroken chain when it comes to metrology? Let’s go to the start of the chain. We will use N.I.S.T. for discussion purposes but really it applies to any of the international organizations that set standards for metrology.

  1. We start with a reference point. This is a universally known measurement value of a particular measurable event. For example, the melting point of ice. (N.I.S.T uses a thermometer as an example on their website.)
  2. This reference is used as a standard by N.I.S.T. I assume that means that a correctly calibrated thermometer will measure – well, I’m not sure exactly what it will measure. It is close to 0 degrees Centigrade. There are various factors that can determine the temperature, such as atmospheric pressure and the purity of the actual water that the ice is composed of. The point is – a standard is set that will be used to begin the chain. This standard is the reference that all other measurements down the chain are going to be traced back to.
  3. Going down the chain, we compare the measurements of the next instrument to be checked against the N.I.S.T. measurement , then document the differences in the results. Depending on the conditions of the measurement, we can make the necessary adjustments needed to arrive at the most accurate measurement but can never be absolutely certain of a true value. Like much of life, we do our best. The “best” is a range of values that approximates the value of the N.I.S.T standard. This range of values is the range of uncertainty. You know that somewhere in this range, lies the true value and if you calibrate an instrument to show results within this range, you should be able to certify your instrument as calibrated according to the standard. If along the way, you lose the reference, your instrument cannot be considered to be calibrated according to the N.I.S.T. standard.

I know! This is a rather crude, simplistic explanation of the process. I “did my best”!

I got further confused after my visit to the supermarket today. They had fresh whole chickens on sale with a limit of 6 Kg per customer. For the customer’s convenience, a scale was placed near the chickens, allowing the customer to verify the total weight of his selection. The trick was to see whether you could get four chickens for 6 Kg, despite the average weight of 1.55 Kg per chicken. You do the math now. It seemed a shame to buy only three chickens and thus not take full advantage of this special sale. Four chickens were over 6 Kg and three were under by quite a bit.

Chicken

Photo credit: P. Naumann

Well, I came pretty close. I managed to find two smaller looking birds and my total weight on the scale (when last was it calibrated, I wonder?) was 6.14 Kg. I went over to the poultry supervisor and told him that I was a little over the maximum weight allowed, and with a smile on his face, he said, “That’s fine.”

<!–Here’s the moral of my little story–>: The more accurate our measurements are, the more honest we can be in our relationships with customers, clients, and other businesses. However, sometimes in life a little uncertainty goes a long way when it comes to give-and-take with others. <!–End of moralizing–>

Of interest:


Enhanced by Zemanta
Please Share

Three Ways to View Power Analyzers on Used-Line.com

Please Share

Do you know that there are at least three ways (maybe there are more) to view Power Analyzers on Used-LIne.com? Of course, the same applies to many of the other categories on Used-LIne. But today we are going to focus on just one instrument category – power analyzers – for illustrative purposes.

These three paths all serve different purposes. Used-Line has so much to offers its visitors!

1. View Power Analyzer Listings

Let’s talk about listings first because this is why a potential buyer of a power analyzer will visit Used-Line.com.

How do you find power analyzer listings on Used-LIne?
Well, I could send you the Used-Line Help manual. No. Let’s be honest. Which of our users really need help finding equipment listings on our website?

You probably fit into one of the following four user profiles:

  1. You are a frequent visitor to Used-Line and have been for years, and could probably give a class on how to navigate our website.
  2. You’ve been keeping up with our blog (you have, haven’t you?), and have learned all the tips and tricks for browsing equipment on Used-LIne.
  3. This is your first visit to the Used-Line website. You are in the market for a power analyzer and your favorite search engine brought you here.
  4. You have no interest in power analyzers or in test equipment in general. You simply enjoy reading this blog!

Profile 1: You know what you’re doing.
Profile 2: You’ve learned what to do.
Profile 3: Used-Line developers have made searching on Used-LIne such a cinch, there is no need for instruction.
Profile 4: Keep on reading!

So, no instructions needed – only a link: Used-Line Power Analyzer Ads.

Now that you’ve seen the listings, how about some descriptions of the various power analyzers that are listed?

Which takes us to Used-Line’s specifications pages for test and measurement equipment.

2. View Power Analyzer Specifications

If you followed the link to the power analyzer listings on Used-Line, you will have noted that there are 871 listings (as of today’s date)! Of course, you may have already decided which model you want, or you are a dealer looking for a specific manufacturer’s analyzer for one of your customers. But, what if you’d like to know a little more about a particular model? Or you want to check specs and features of a number of models before making your purchasing decision? What kind of power analyzer operation modes are essential to your work environment? Is harmonics measurement a must-have feature?

In other words, you would like to learn more about what types of analyzers are available and drill down into some specific characteristics about the various models in the market.

Here’s what you can do:

    1. Visit Used-Line’s T&M Specifications pages.
    2. Choose Power Analyzers.
    3. Browse the analyzers if you wish, then select one that you are interested in, for example, the discontinued Fluke 435. And here it is.
      Used Fluke 435 | used-line.comFind your used Fluke 435 Power Analyzer at used-line.com, the Online Marketplace for used Test and Measurement equipment.

      Embedly Powered

And here’s the best part! After studying the specs and features of the Fluke 435, you may decide this is just what you have been looking for. Scroll up the very page you landed on to view the Fluke 435 features description and you will find all the current Fluke 435 listings on Used-Line.

3. View the Power Analyzer Glossary

Yes, Used-Line actually provides a glossary of terms. Most, but not all the terms, are key specifications organized by instrument. Figuring that most of our users are familiar with the specs of the instruments they are interested in, we’ve hidden the glossary in the small fine print that can be found at the bottom of each page. Go ahead and see if you can find it. You just never know when you may need to look up a spec description while browsing our listings. Let our glossary get you started on your search for specification definitions. In case you don’t have a magnifying glass on hand, here’s the link. Of course, you want the Power Analyzer glossary, so that in case you were losing sleep wondering what Total Interharmonic Distortion really is, click below to find your answer.

Power Analyzer Glossary Terms | used-line.comA power analyzer, also known as an energy analyzer, is an electronic device that measures single-phase or three-phase electrical energy as it flows through a circuit or is distributed through electronic or motorized equipment. Electrical measurements commonly taken with a power analyzer include volts, amps, watts, frequency, reactive power hours, maximum power, phase angles and harmonic distortion.

Embedly Powered

And you thought that Used-Line is just a market place for pre-owned hi-tech and scientific equipment?! Of course, it’s that! And much, much more.

Please Share

What to Consider when Purchasing a Digital Multimeter

Please Share

The Digital Multimeter (DMM) is the most fundamental test and measurement instrument in the electronic technician kit or engineer’s lab bench. It provides a number of functions, the most common being resistance, voltage and current. Secondary functions can include temperature, induced current, low frequency measurement, and other routine tests needed to troubleshoot circuits.

DMM types

Many technicians use more than one digital multimeter, as they tend to be designed to suit a particular purpose in various environments. A DMM used in a clean room or laboratory is totally unsuitable for use in an outdoor environment or under harsh or hazardous conditions. In practical use, the DMM may need to be operated while wearing gloves during an ice storm, or may need to be handheld, extremely compact, and lightweight for portability. They can be rack mounted in a semi-permanent installation to be in close proximity to equipment that needs to be constantly monitored.

Here is an example of a DMM that can operate in temperatures below -40°C: The Agilent U1273AX.

U1273AX Specifications and FeaturesLearn more about the various features and specifications for the U1273AX.

Embedly Powered

DMM accuracy standards

Some DMMs are functional and practical, even without routine regular calibration certification. When the tolerance of a resistor may be 10% or 20%, a DMM accurate within 3% is generally sufficient. In the days of analog D’Arsonval meters, parallax distortion and the vagaries of electromechanical movement could result in erroneous readings near 2 to 3%. DMMS are far more stable and immune to misinterpretation of the readout.

 DMM longevity

DMMs have a relatively high attrition rate. This is the result of multiple meters required by each technician in the field and not so much a failure of an instrument. DMMs are designed to be used hundreds of times a day, both in laboratory and field conditions. Field equipment is often subject to abuse from impact of a dropped instrument to total immersion in water and similar environmental hazards. Laboratory equipment needs to be replaced as technologies advance and evolve.

DMM features

DMMs are basically the same instrument, regardless of the make or model. What distinguishes one from another are cosmetic appearance and the user interactive interfaces. Each of these differences are highlighted as features. Not every meter can have every feature; it is up to the technician to know which configuration on a DMM is optimal for any given situation.

DMM advanced or enhanced features

Some typical enhancements include dual displays, RS-232, USB or IEEE computer interfaces, audible alarms or tone feedback, which enables the technician to keep his eyes on the device under test rather than on the meter. High-priced options include very tight measurement tolerances. Some enhancements can include backlit LCD displays, as opposed to LED displays. Induced current “clamp meters” and similar exterior measurement accessories are usually optional, but may be included as a part of a package. Some features include hold and store min/max readings, auto-ranging or auto-sensing circuitry and similar hands-free operation. If multiple and various readings are necessary, these features can offer a vast improvement over manual ranging and repeated button-pushing to change DMM settings.

Here is a DMM with a USB host port on the front panel: The Tektronix DMM4040.

DMM4040 Specifications and FeaturesLearn more about the various features and specifications for the DMM4040.

Embedly Powered

 Advantages of used DMMs

Of course, this is where Used-Line comes into the story. Leasing companies, larger companies employing scores of technicians, or smaller small- to medium-sized businesses seeking to stay within tight budgets can be well-served by considering procurement of used and re-certified, discontinued models or factory-refurbished DMMs. This is a cost-effective solution that will serve the company now and into the future. All technicians have particular makes and models of test instruments that they have high-confidence with using every day. In field applications, many techs prefer Fluke and Simpson meters for their ruggedness, durability and useful features without resorting to gimmicks or unnecessary bells-and-whistles. Given that some DMMs can cost over $10,000, depending on the degree of precision and accuracy required, buying used or as-new discontinued instruments can make or break a budget.

 Selecting the right DMM

Choose the best quality instrument that meets your need. With higher-priced test equipment it is a wise idea to lease an instrument to ensure its suitability to the task. Realize that equipment turn-over for many of the top leasing companies is due to deprecating features or advancing technology. Leasing companies frequently sell their equipment to used-line.com clients in sufficient quantities to make offering them at steep discounts possible, with no sacrifice to name-brand quality, dependability and service.

We can’t exit this blog post without showing a Fluke. If you’re looking for 365-day stability, have a look at the Fluke 8508A reference multimeter.

8508A Specifications and FeaturesLearn more about the various features and specifications for the 8508A.

Embedly Powered

Please Share

Opting for an Optical Tme Domain Reflectometer (OTDR)

Please Share

Choosing an Optical Time Domain Reflectometer (OTDR) is very similar to the process used in selecting a new vehicle. The more options that are included – or added – the more it will cost. Some OTDRs are built with rugged utilities for heavy field use, others are delicate precision instruments suitable for laboratory use. Any high-quality OTDR is a significant expense; most cost as much – or more – than the majority of new motor vehicles. The same amount of thoughtful consideration used to buy a car should be used in selecting and buying an OTDR.

An OTDR is a complex instrument incorporating optical frequency pulse generators, a spectrum analyzer, and supporting user interface to determine the location of faults, relative impedance, signal degradation due to attenuation or deformity in the fiber, and often has a computer interface or plug-in modules to allow a separate computer access to the test and measurement device and data for more sophisticated online or offline analysis than may be available from the instrument alone.

Operating Environment

The first and most important consideration is where and how the OTDR is deployed when it is in use. Exposure to extreme weather, limited availability of electric power, and the required degree of portability eliminate any OTDR that isn’t ruggedized, battery powered, and reasonably sized, such as a hand-held. A rigid bench, wheeled carriage or rack mount unit used in a power- and climate-controlled clean room or engineering laboratory environment dictates a completely different set of options. It may be required that the OTDR is dual use, and trade-offs must be considered to determine the best value balanced against the risk of potential damage when in transport or in active use.

Operational Capabilities

Acquiring an OTDR should not be solely based on financial or budgetary considerations. Cost does not necessarily translate to effectiveness; a very expensive unit can be totally unsuited to measure the cable under test. If a unit is simply to be used to determine the location of a break in the cable and not more esoteric measurements, such as impedance mismatch, kinks or sharp bends, attenuation or signal losses, then it can be much less expensive than a full-feature instrument of otherwise similar size and utility.

New, Discontinued, Factory Refurbished or Used: Which is the best choice?

The only reasons to buy a new, bleeding side of the cutting edge technology are that the company is a manufacturer or the application is mission-critical. Often, a discontinued instrument offers substantial savings and superior value – often 30% or more – especially if it is a brand-new unit, simply no longer manufactured. A factory refurbished instrument meets or possibly exceeds the original specifications. These units are typically factory warranty returns, leased instruments, trade-ins for upgrade to newer models and similar light-use applications reconditioned by the OEM for resale. Savings of 30% to 50% are not unreasonable expectations. Used instruments can offer very high value, however, due diligence is required to ensure ample time – typically 30-90 days – for inspection and return privileges if the unit fails to perform. Cosmetic exterior wear and tear consistent with its operating environment are not uncommon. Used units that perform to specification can realize values from 60% to 90% below the original MSRP.

Brand name or OEM?

Some people are comforted by particular makes and models of test equipment. In many cases, the difference between a name-brand device and its OEM equivalent are cosmetic – the internal circuitry is identical. The wise buyer will consider the specifications before the name brand, the reliability and integrity of the source of the equipment and the particular requirements of the technician or engineer that will use the equipment. The length and scope of any warranty or guarantee must also be considered, especially with used instruments. Is the warranty a factory warranty or outsourced to an unspecified third-party?

Relative value

An OTDR can easily cost 20 to 50 thousand dollars or more. Used OTDRs can also cost 40 thousand dollars or more. A capital expense item of the magnitude of an OTDR can have significant tax implications. The ROI of a used unit often is much faster than a similar new instrument and it can have a steeper depreciation. Before purchasing an OTDR, it is suggested that the engineering staff that will be using the device, the accounting staff that will handle the budgeting and payments, and the executive officers that will have to justify the expense, be in agreement. This can be difficult; however, the use of an independent third-party systems consultant can often provide assistance in coordinating the various aspects of an acquisition with minimal impact on limited corporate resources. Before opting for a low-cost solution, consider the functionality, specifications, and usability requirements of the tasks that the instrument will be used for.

Please Share

Three Test & Measurement Instruments You Can Create with a Smartphone

Please Share

Should I be embarrassed to even admit that I don’t own any kind of smartphone? I own a Kindle. Does that count? Somehow, I don’t think so.

But despite not being able to try this out for myself unless I borrow my brother-in-law’s iPhone or my  niece’s Android phone, this is the first thing that has really tickled my fancy about smartphones (aside from Waze).
3 Test & Measurement Instruments You Can Create with a Smartphone Signal Generator, mixed signal… Click To Tweet

Test & Measurement Instruments

Test & Measurement Instruments

Anyway, back to the topic. I’m talking about turning your smartphone into a test & measurement instrument. Not a surprising development. And not that new, either. For some time now, we’ve been watching T&M instruments approach the size of smartphones. Handheld T&M instruments, while not necessarily offering the type of specs you’d find on a benchtop, have been finding their niche in the market as engineers are called upon more and more to leave their benches and go out into the field without the inconvenience of a heavy bag.

I don’t think smartphones are ruggedized enough yet to withstand the conditions that handheld T&M instruments are built for, although according to an article in the National Instruments Developer Zone, smartphones do have the potential to at the very least take over handheld  meters in the field.

Anyway, let’s take a look at just a few sample products (there are many more out there), and see what we can measure with a smartphone.

 The ‘Scope on a Phone

This should be a cinch, right? Simply show voltage over time? Yes, but what scope leads do you use? Do you need some sort of external hardware module? If you short two pins on your Device Under Test – will you fry your smartphone? What happens if your phone rings while you’re checking the output on pin 3 of your 7400? (I did not invent this question!)

In 2010, Onyx Apps introduced Oscilloscope 1.0 for iOS. The write-up on DailyAppShow describes the features and capabilities of this app, which can also generate sine, square, triangle, and sawtooth waveforms up to 22 kHz. Instead of using the  audio input, which is somewhat limiting in terms of sampling and frequency, the Onyx scope app uses the microphone or a device plugged into the microphone input. Today, Version 1.9 is available. This app offers many of the typical features you would find on a desktop oscilloscope, such as triggering modes (Normal, Single, and Auto), screen capturing ability, reference signal calibration, and more.

The Mixed Signal ‘Scope on a Phone

Believe it or not!

How did they do that? We can thank Oscium for its Model iMSO-104 mixed signal oscilloscope (MSO) for iPad and iPhone, which consists of a module that includes one 8-bit analog channel and a four-input digital harness.
3 Test & Measurement Instruments You Can Create with a Smartphone Signal Generator, mixed signal… Click To Tweet
You might need something a little more serious for devices in the GHz range, but with a 5 MHz analog bandwidth, a sample rate of 12 MS, and the ability to instantly probe a circuit from a tiny device powered by an iPhone or iPad, who’s complaining? The software app is super user-friendly, replacing knobs and buttons easily with those adept key strokes and finger swipes.

Here are some interesting pointers I learned from the FAQ on the Oscium site:

  • The analog channel can be used for measuring AC or DC. Maximum voltage range is -40 V to +40 V (10x mode).
  • Digital threshold is 1.7 V (fixed).
  • Triggering is available up to 100 ms. What’s really cool is that if your timescale goes higher, the triggering menu disappears. Although this can be scary when you first encounter this phenomenon, it’s a user-friendly tip once you’ve learned why or when this occurs.
  • The IMSO-104 is supported by iOS version 5.0 or higher.

 A Do-It-Yourself Signal Generator

Test & Measurement Instruments

Test & Measurement Instruments

An article that appeared this month in an EDN Network newsletter does not consider the 20 Hz to 20 kHz frequency range of a smartphone’s audio plug to be a limitation. There’s a lot you can do in this range. The article suggests that many of the components in medical devices fit into the lower end of the range. Here are some examples found on the National Instruments site:

  • ECG (or EKG): 0.01 – 300 Hz
  • EEG (electroencephalogram): 0.1 – 100 Hz
  • EOG (electrooculograph): 0.1 – 10 Hz
  • EMG (electromyograph): 50 Hz – 3 kHz

With the availability of hardware and software for less than $20 (not counting the cost of the smartphone!), and some light labor (get out your soldering iron) you can be up and running in no time with two channels (your left and right stereo connections) generating sine, square, and sawtooth signals.


Please Share

It’s All in the Tool

Please Share

TRAVELLING BACK IN TIME

So there I was in front of the kitchen sink, scrubbing this pot that had at least eight years of grime stuck to it, having realized that I don’t want to keep serving Chicken Cacciatore left over from January 2013 to my family. Nor that delicious pot roast in wine sauce that I concocted in March 2012. I mean, both beef and wine do age well, but we’re talking health hazards here – not epicurean tastes.
So, sighing with muscle fatigue, regretting that I had stopped popping in to the neighborhood gym park some time ago, and realizing that the only iron I was pumping these days was beneath the enamel of the above-mentioned pot, I opted for a coffee break, using my left hand to pour (my right arm having ceased to function normally after its scrubbing aerobics), and decided to rest for a few minutes and ponder the tackling of this task.

coffeeCoffee always inspires! I remembered! The green baize scrubby thingy works wonders! Well, not exactly baize – more like a rough green plasticy sheet that feels gentler than sandpaper but works in the same way. After a thorough search for a piece of the green wonder (the coffee gave me the energy to do this), I found some of this treasure in the drawer at the bottom of a kitchen closet that only opens if all the other doors in the room are closed (Don’t even ask!). A few minutes inside my pot, after taking another rest to recover from the drawer/closet battle, and I could view my own reflection inside my suddenly-like-new pot!

DON’T LET THE EQUIPMENT BEAT YOU! YOU CAN DO THIS!

This ultimately successful experience reminded me that winning battles with equipment is all in the tool! It threw me back to my technician days at Bull HN Information Systems. H = Honeywell, and N = NEC. If you are too young to have heard of Groupe Bull (pronounced Bee-yool in France, home of the company’s corporate headquarters) in their Honeywell days, here’s a link to a little history about Honeywell and it’s relationship with Bull.

Don’t Let The Equipment Beat You! You Can Do This! Click To Tweet

A BRAND NEW & PROUD ELECTRONICS ENGINEERING TECHNICIAN

Proud to have graduated as an electronics engineering technician from Seneca College, Toronto, I arrived at my first job in 1991 – at Bull’s Component Repair shop in Scarborough, Ontario, eager to try out my new troubleshooting skills with a DMM and scope. My analytical skills knew no bounds. Really, all you need to know to succeed in this work are a few logic gate specs and some sort of expectations about what should be showing up on those pins: 5 V, maybe 3.3 V, 0 V. Some interesting waveforms on the screen. Right?

Wrong!

INFORMATIVE REPAIR REQUISITION SLIPS

So, first things first. Read the complaint written on the Repair Requisition slip. These can be very informative.
Like this one:
“Dead”.

A DEAD DUMB TERMINAL?!

That’s quite useful information. Usually it produces the avoidance response. Avoid powering up the instrument. Avoid calling up the customer to enquire, “So what’s actually wrong with the instrument?” Why not just avoid trying to repair it?

Not an option.

LET’S CLIMB INSIDE A MONOCHROME HONEYWELL DPS

Okay, then, let’s take a look INSIDE! My job was to repair monochrome monitors and Honeywell DPS “dumb” terminals. The terminals weren’t really dumb – but after a while, the technician (yours truly) got to feel like not such a bright spark.

In order to view the inside of the instrument, you need to open it up. How I struggled to open those boxes. On my first day on the job, I was presented with a set of tools including a power screwdriver, all shiny and red.

It had a forward/reverse button and I had two bits for it, a Phillips and a flathead. As soon as I saw it, I thought, “This is it!” This tool will take me anywhere I need to go.
As it turned out – not everywhere.

Well, after ruining the threads of almost every screw on the terminal, I bashfully, in a rather subdued voice, approached my co-workers for advice. “Help me, help me, help!”, she cried. After ensuring that there were no hunters chasing after little rabbits, (Scarborough, Ontario not really being a cottage-in-the-woods kinda place) three technicians called out in unison: “It’s All in The Tool”!

I dropped my powered screwdriver like a hot cake, and trying to be brave, dared to ask, “What tool?!”

Screwdriver in toolbox

THE POWER OF PHILLIPS SCREWDRIVERS

And out they came – the powerful, yes, but not powered – the wonderful Phillips screwdrivers in all shapes, sizes, and lengths. Why did I not have one of these in my default tool set? Because they all came from Dad’s toolbox in his shed in the backyard. Note that ISO 9002 came later – we were still basking in the days of unrestricted shop conditions. They went on to explain that the power screwdrivers are fine for many tasks but not for those stubborn screws that have become embedded in plastic after years of heating. It’s guaranteed that they will want to remain right where they are. But, wait, there’s more.

THEY DID NOT TEACH ME ABOUT TORQUE IN SCHOOL

It’s not only in the tool, my new instructors cried – it’s also in the torque. Torque? And then my new-found instructors taught me how to use the tool. Choose the correct size screwdriver, position the tool correctly in the screw, apply pressure. and only then, turn. Fortunately, those were the days preceding my need to take coffee breaks each time I applied a little torque, else I would probably have been responsible for breaking some sort of Union law relating to multiple coffee breaks.

THANK YOU, BULL HN COMPONENT REPAIR IN SCARBOROUGH, ONTARIO

After that, opening equipment became a breeze. I couldn’t wait to pass on my new-found knowledge to the new wet-behind-the-ears recruits, who, like me, thought they knew it all. Now, so many years later, I would like to thank my co-workers in Bull HN Component Repair for their patience, excellent skills, and teaching abilities. I really appreciated all your assistance. Thank you!


Please Share